Thursday, June 4, 2009

Tuesday, May 26, 2009

MOCK UP


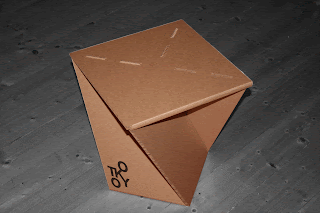
Here is the rough 1:1 mock up of my concept. I am very please with the way this is going. I really like the form. Though I think it could be tweaked a little. I think the seat needs to be smaller in length and width and also a little bit higher from the ground. It was strong when it came to downward pressure but due to its twisting look it was not so strong from sideward pressure. So with that in mind I will need to come up with something to hold the angled faces in place. I am thinking some sort of tab locking system.

FINAL DESIGN DEVELOPMENT


So this idea is really coming along, it still needs some refinement which I’m sure will be shown when the 1:1 mock up is completed. Also I’m thinking the dimensions might need some adjustment. Though there isn’t a huge amount of xanita board left to spare, as there is only one piece to the whole chair.

CONCEPTS SCRAPED FOR NEW IDEA

The further I developed my concepts the less I liked them and the more there flaws became obvious. But through the design process of these I have stumbled across a range of new ideas. One in particular that I really like and plan on talking further. It revolves heavily around folding and angles. Is looking rather promising.

Wednesday, April 22, 2009

CONCEPTS AND IDEATION


Here is my research and initial concepts. I originally wanted to do something modular that can be combined with multiple seating structures of the same kind, and just link up to make different and interesting shapes. But that idea got scraped when I started realising how big they would be and also how difficult it would be using folding techniques to make these shapes. I then moved on to chairs for all purposes. My first idea was to use one long piece which would slowly get thinner in width so that it was able to fold into itself using slots. To make it stronger I put brackets in the centre. Third idea was to used the famous origami shape with the four points which would make up the legs. I wanted to put a back on the chair but it was seeming going to be a problem.

ESQUISSE 4 - XANITA BOARD TESTING


Tuesday, April 7, 2009

ESQUISSE THREE - 3D TRANSLATION REWORKED


I decided I thought I could improve on my shape, so I gave it another go. This time I combined one of the techniques I used in the first round of attempts with another folding and locking technique. I used repetition of folds and shape to create a spider type shape that would fold into a hexagonal shape. Then it was to be slotted into position with the other part. It ended up looking really good and a rather realistic paper interpretation to the actual object.

Monday, March 30, 2009

ESQUISSE THREE - 3D TRANSLATION


For this esquisse I found some sort of flowery type thing that I thought had a rather interesting shape. Though I thought it would be quite a hard shape to reproduce realistically. I tried a few different methods here. I first tried a cubic boxy kind of method using folding, rolling and a locking method to keep it all together. Though it didn’t look exactly like the flower it was an interesting shape. Second attempt was sing origami style folding techniques. This time focusing on the flower fart rather than the bulb. This turned out really well and I thought was a good more realistic representation of the flower. The third attempt I wanted to replicate the entire body so it would look the same from every angle. I did this using slots and repetition of the same shape, which I guess refers to the Fibonacci sequence. Though did not look as interesting as the others.

ESQUISSE TWO - LOCKING SYSTEMS


My first idea was based around tension. The more weight applied the stronger it became. I did this by cutting numerous pieces of cardboard into “rows” the same size and then cutting a slit in them big enough for a separate piece of cardboard to slide trough horizontally. Each “row” had a slit at a different height. Starting from low at the outer edges and reaching there highest point at the centre. This caused enough tension to make that “U” shape. When pressure was applied, the “rows” were pulled together to make an extremely Tight and taught structure. Unfortunately this idea didn’t work with the material I chose to make the final out of as it was to stiff and had no flex in it. Thus resulted in making a slot structure. Though strong it had its problems as getting the slot cut outs at the precise size was rather difficult.

Tuesday, March 17, 2009

ESQUISSE ONE - UNDERSTANDING FORM + GEOMETRY


Here are my attempts at the Cube, Five sided pyramid and the Sphere. I created these using origami style folding techniques. The sphere was rather challenging as I had to make it out of numerous pieces that slotted in together. Overall I’m happy with the results